Showing posts with label Birthday. Show all posts

Monday, September 6, 2010

Taylor is 2!!!

My baby is 2!!  I can't believe it!  It seems like she was just a newborn a couple of months ago!  We celebrated her 2nd birthday yesterday and had an amazing time with family and friends!

Welcome to our Watermelon Birthday!!

Birthday signs for the post thingies!
Dining Room Shot
Tissue Paper Pom Poms!
Shelf Close Up
Cardboard Canvas!
Watermelon Invites, Spray Painted Cans, Watermelon Straws!
Lime/Jello Watermelons!
Hours of fun!
Birthday Girl!!!
Happy Birthday TayTay!!  Mommy loves you!

Tuesday, August 3, 2010

Cardboard Canvas

I am back on the birthday bandwagon tonight!  The other day I started wondering what am I going to do with most of the stuff I make for Tay's birthday.  Don't get me wrong, most of it cost hardly anything to make.  But I hate to spend money on things that probably won't be used again.

I wanted to make some signs to put up around the house and in the front yard for the day of her birthday and since my Dad took his saw back I can't cut any of the wood I have in the garage and then I remembered I threw away a cardboard box yesterday.  So I proceeded to dumpster dive and fish it out!
It's cute and basically free!!

I cut out my cardboard to fit a frame I have in my collection.
I painted the cardboard white with craft paint and a foam brush, be sure you do several lite layers or else your cardboard will get mushy.  I used my Cricut to make some stencils and painted away.

Sorry about the white on white :(

I sanded my faux canvas down, I want it to look more like it belongs in a field than in my dining room!  I used the Doodlecharms cartridge to cut out the watermelons and foam dots to adhere it to my cardboard.


I am going to go get some nails with large heads on them and add them to the corners for a little bling!  I think it turned out really cute and maybe I won't feel so bad getting rid of it when we are done with it because it's only cardboard, unless someone else has an amazing idea on what to do with the b-day stuff when we are done!  I can't wait to make some more!

Saturday, July 31, 2010

Birthday Signs!

Are you guys tired of Watermelons yet?  I hope not cause I have lots more to come!  Tonight I worked on the signs for my front step sign hanger things!  And guess what?  I didn't use vinyl this time, but I did use my Cricut!


I made stencils using the Calligraphy cartridge and CDS and painted all the letters!  I used the sander to make everything look a little old, added a couple of Watermelons, some ribbon and my favorite cheap upholstery tacks from WalMart.  I can't wait to hang them up....34 days and counting!

Don't forget to enter my $50 CSN giveaway here!

Wednesday, July 28, 2010

Watermelon Anyone?

I am in birthday mode!  Only 5 weeks til Tay turns 2 {insert tear here}.  I finished her invitations tonight!  And of course since it's 10 o'clock I can not get a decent picture, I will try again tomorrow when the sun is out.  But for now here they are!

Tay ♥'s Watermelon!


Have I mentioned that I now my sewing machine?  Paper is so much easier to sew than fabric, there are no folds or seams that I have to worry about!  I have seen so many cards on etsy that are embroidered that I figured I would give it a try.  It was so easy!

I figured out a little trick!  It only took me 3 cards to figure out because I was too lazy to get up and google sewing paper!  There is an annoying string that shows on the front of the card and I knew I couldn't cut it off because my card would fall apart because I was too lazy to glue the pink paper to the green paper before sewing it!

Notice the annoying string?
 Carefully pull your bottom(bobbin) string from the back of the card.  It will create a loop like the picture on the right.  Gently pull the loop until the annoying string is pulled all the way through and both of your strings are on the back.

So much prettier without said annoying string!
I used my cricut to cut the watermelons using the Doodlecharms cartridge.  I found the paper at Hobby Lobby, it is My Mind's Eye Penny Lane Collection.  I cut the seeds out of glitter card stock.

I think they are finished...part of me wants to add something else to them.  "Hi my name is Kenzie and I can't leave well enough alone."  I need an intervention!  Hope everyone has a great night!

Featured at Craft-O-Maniac

Sunday, July 25, 2010

Tissue Paper Pom-Poms

Taylor is turning 2 at the beginning of September and I am already starting to make decorations!  I can't believe my baby is going to be 2 in 6 weeks :(  Today I asked her if she would stay little forever and she said that she would, I told her she couldn't grow or learn any more words and she agreed, she seemed cool with it!

The theme for her party is going to be watermelons, I think, at the very least it will be a pink and green birthday!  I was googling tissue paper the other day and found a tissue paper pom-pom tutorial on Martha Stewart's site here.  I am not a huge Martha fan but I can't argue with cute and cheap!


Just in case you don't want to go check out her site I have included my picture tutorial.


I used the Hallmark tissue paper from WalMart for the pink and green pom pom-poms.  There were 9 sheets per package for $1.  I made 4 pom-poms from each package.  I bought the white tissue paper at the Dollar Tree and cussed it every step of the way, it wasn't as strong as the WalMart tissue.


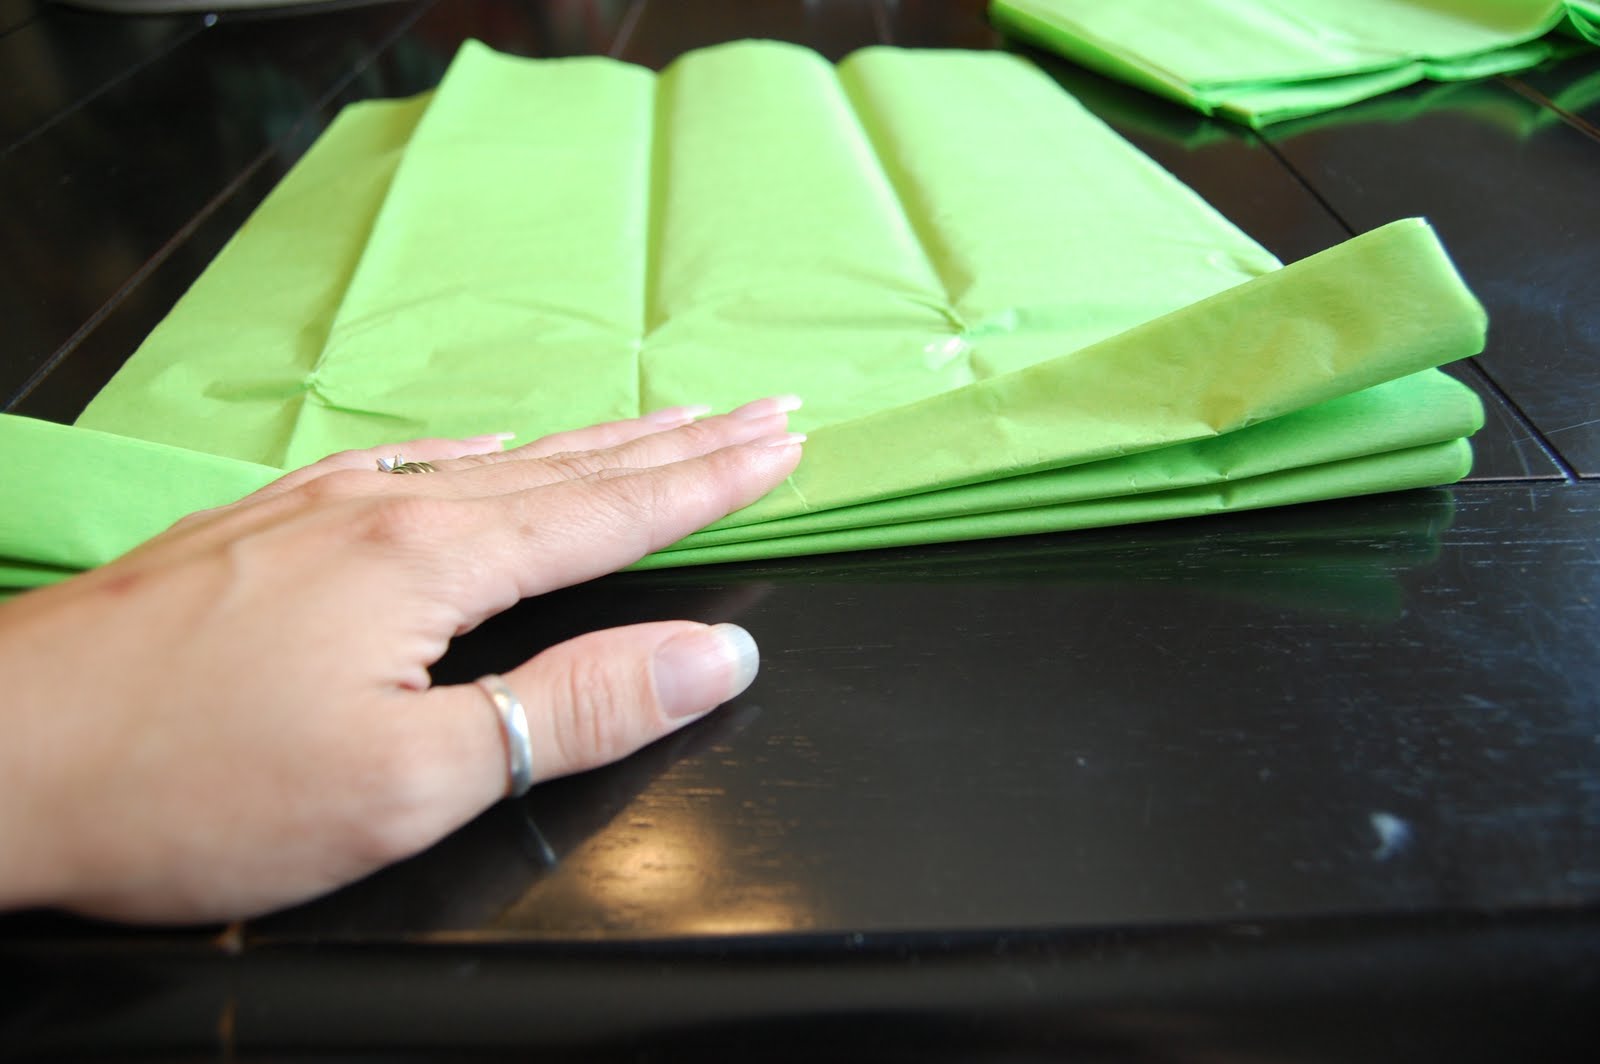
Make approximately 1.5" wide accordion folds.


Tie a piece of craft wire around the middle of your paper, you could also use twist ties or a piece of pipe cleaner.  Round the ends of your tissue paper.


Start by pulling up the top layer of tissue paper and fluff.


Continue to pull up the tissue papers and fluff.  After you have pulled up approximately 4 sheets of tissue turn it over and work from the other side.


After you have finished pulling all of the papers start to fill in the holes by fluffing to your liking!


Here is one of my finished pom-poms.  Aren't they going to look so cute hanging from the dining room chandelier!  6 weeks and counting!  At least I have a good head start!

Saturday, July 17, 2010

Harley Inspired

I am finished with my latest project!  It was miserable and I hated it 50% of the time that I was making it but I think it turned out awesome!


Harley Davidson inspired invitations!  My good friend is throwing a surprise birthday party for her boyfriend!  When she asked me if I would make the invitations I was hesitant to say yes because I usually don't do "boy" stuff let alone "man" stuff.  Fortunately for me he happens to be a biker and happens to ride a Harley!  So in true Harley style I used black, white, orange and grey.  The skull was easy, it looks tough and bikerish but it wasn't enough.  So I added metal mesh and hand-made barbwire.


The barbwire was the worst idea ever, but completely genius!  My fingers hurt so bad from wrapping wire.  But I think it adds the right touch of "man bling" to the invite!

I used the Indie Art cartridge from Cricut for the skull.  The skulls were also a huge pain in the you know what!  I inked the skulls and the crossbones.  The crossbones were not attached to the skull so I had to glue them all on...Boo!


Thank goodness for my spray adhesive!  Have I ever told you how much I love that stuff?  Oh yeah, I did here.  It is strong enough to adhere the metal mesh to the card, love, love, love it!


This project was a success, thank goodness....not that I was worried or anything!

Featured at Life in the Pitts

Sunday, March 28, 2010

3rd Birthday Party!

Kielyn's birthday party was a success!  She told me it was the best birthday ever!  I love 3 year olds!  They are so grateful for the littlest things!  Here are a few pictures of the things that I made for her party.
Birthday Banner
Jute and Scrap Paper Garland

Birthday Invitation and Dollar Store Buckets

When she woke up Saturday morning and saw everything out she was so excited and told me I was the best Mommy ever (totally made the long nights worth it!)

How adorable are the sister dresses?  I ♥ them!

Who doesn't love cupcakes?  I think they turned out perfect and it was so much faster than decorating a cake that I never think is good enough anyway!
And here is the Birthday Girl!!  I can't believe that she is already 3!  Isn't she gorgeous!?!?

And here is sister!  Doesn't she look so dainty and lady like?
Not so much!  Look Mom, no hands!

3 years ago I looked like this!
And a day later I looked like this...
Seeing the happiness in her little eyes on her special day thrills me.  Being a Mommy is the best job in the whole world!

Related Posts with Thumbnails