Showing posts with label Tips and Tricks. Show all posts

Wednesday, September 22, 2010

I Should Have Been a Repairman

I really think I missed my calling in life.  I should have been a repairman.  Remember how I fixed my dryer and found the city of Lintville?  Ugh!  Thank God our house didn't burn down.

Well tonight I started dinner and turned on the garbage disposal.  What?  Why aren't you chewing up my food?  So I turned it off and turned it back on.....all I heard was a hum.  Maybe you can turn it off and back on like a computer and it will work right.  Not so much.
So I called my uncle and told him about my dilemma and he told me the secret to fixing the garbage disposal!

I love that it has a name!
So my garbage disposal came with this nifty little tool that I am still amazed that I found!  If you can't find yours get out a set of allen wrenches.

Check out the bottom of your garbage disposal...the side that's under the cabinet and not in the sink, not that I stuck my hand in the nasty water or anything.

See the hole in the bottom of the garbage disposal?  That is the manual grinder or something like that.
 Stick your garbage disposal tool into the hole.  Normally your tool should turn freely side to side.  Not mine, it was stuck.  So I had to manually grind up whatever was stuck in there.  Just turn back and forth until your tool moves freely.


Turn your garbage disposal back on and it should work!  Yay!!!  I fixed my own garbage disposal and there for should be a service repairman!
One happy sink!  And one more thing to add to my resume!

Monday, August 23, 2010

Boring Day, But a Great Tip!

Not a whole lot going on here today.  Ben left again for the week.  He is training for work.  **Crazy weirdos....I have a house full of guns just waiting to be used!**  Anyway, I did get one of my metal Hobby Lobby finds hung up, but I think my 2 year old hid my camera...the search continues.  So until then I have a great tip/trick for you tonight!

Last year around Halloween, I was painting my toenails black on the living room carpet.  Kielyn decided that she wanted black toenails too, so as I was painting Kie's toe nails, Taylor who had just turned 1 decided to help.  She decided to pour half a bottle of black nail polish all over my beige carpets.
*Insert extremely inappropriate long string of curse words, thank God my kids didn't repeat any of it*

PANIC!!!!!

How in the heck do you get black nail polish out of beige carpet and what did we do before google?!?!

The answer is Windex!

Windex will remove nail polish from your carpet!  Spray the spill with windex, blot, spray, blot, spray, blot and repeat until the polish is gone!  It is a miracle! 
See, nothing exciting going on here tonight, but at least this might save you a headache somewhere down the road!  I am off to watch the Season Finale of Army Wives!
P.S.  Did you enter my giveaway yet?  If not click here!

Wednesday, July 28, 2010

Watermelon Anyone?

I am in birthday mode!  Only 5 weeks til Tay turns 2 {insert tear here}.  I finished her invitations tonight!  And of course since it's 10 o'clock I can not get a decent picture, I will try again tomorrow when the sun is out.  But for now here they are!

Tay ♥'s Watermelon!


Have I mentioned that I now my sewing machine?  Paper is so much easier to sew than fabric, there are no folds or seams that I have to worry about!  I have seen so many cards on etsy that are embroidered that I figured I would give it a try.  It was so easy!

I figured out a little trick!  It only took me 3 cards to figure out because I was too lazy to get up and google sewing paper!  There is an annoying string that shows on the front of the card and I knew I couldn't cut it off because my card would fall apart because I was too lazy to glue the pink paper to the green paper before sewing it!

Notice the annoying string?
 Carefully pull your bottom(bobbin) string from the back of the card.  It will create a loop like the picture on the right.  Gently pull the loop until the annoying string is pulled all the way through and both of your strings are on the back.

So much prettier without said annoying string!
I used my cricut to cut the watermelons using the Doodlecharms cartridge.  I found the paper at Hobby Lobby, it is My Mind's Eye Penny Lane Collection.  I cut the seeds out of glitter card stock.

I think they are finished...part of me wants to add something else to them.  "Hi my name is Kenzie and I can't leave well enough alone."  I need an intervention!  Hope everyone has a great night!

Featured at Craft-O-Maniac

Saturday, May 29, 2010

Bridal Shower Fun!

So I told you all about the bridal shower last weekend, sorry it has taken forever for me to post pics!  Unfortunately I don't have any pics of Audra and me together because I was busy chasing after my kids, but I did get a few pictures!

I actually fixed my hair!  Something I am to lazy never have time to do!

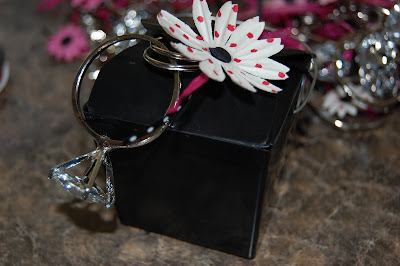
Audra's Mom was amazing, she bought most of the decorations (thank you Kate)!  And I was so excited when she let me make the favor boxes!
I think they turned out super cute!  I am 97% sure she got the diamond ring key chains from Oriental Trading.  I tied some ribbon around the keychains and hot glued the paper flowers onto the ribbon, so easy!


And this was my favorite part, the cake!  I love cake and I love to make cakes even more when they are this easy!  Slap some Oreo Straw sticks around the side and tie with ribbon and call it good, I didn't even have to make the icing look pretty!  I found the flowers from the Dollar Store, I was amazed that they sold such pretty flowers.  I bought the crystal beady thing at WalMart, it's cake garland and I cut it up and stuck them in!  I found the tutorial for the cake at Texas Monkey.  She has some really cute candy cakes too!

And I may not have gotten a picture with Audra, but 2 little girls did!
And yes I like to dress them alike, it's a sickness!  Audra I am so excited for you and can't wait for your wedding!

Featured @ Texas Monkey
Under The Table and Dreaming 

Thursday, April 29, 2010

Spray Adhesives

Are any of you paper crafters?  Card Makers?  Scrapbook Lay-outers (yes I just made that word up)?  Lately it seems like I have been making lots of paper products, I recently finished the place cards, and now I am working on something for one of my oldest and best friends!  The problem I seem to have is that I love to layer paper, I love the look it creates.  I love my tape runners, but I have been going through them like crazy!  Last night I ran out of my beloved tape runner and I didn't want to go to the store so I went digging around for some other kind of tape or glue and stumbled upon a bottle of spray adhesive I bought a long time ago.
My new bff!
My next issue, I only had 3 boxes to use to spray on.
After I gunked up all the sides of the boxes and still had tons more paper to spray I had to no idea what to do.  I double checked the house for more boxes and couldn't find any  :(  I went into the kitchen thinking maybe I could use one of my junky cutting boards and spied a stack of catalogs and magazines.  And this was an amazing find!  Why you ask?
Because I sprayed my 4 pieces and then turned the page to a brand new non-sticky, non-tacky surface!  One more use for all of the magazines and catalogs that pile up on the counter top!  Want a sneak peak of what I have been working on?
 I can't wait to show you the finished product, it should be done tonight!
Related Posts with Thumbnails