Showing posts with label Project. Show all posts

Thursday, July 1, 2010

Flag Fail

What a crazy hectic day this has been.  Kielyn came home from daycare yesterday morning with the stomach bug :(  Needless to say she had a bad day.  I am working from home today so I can stay with them, and yes today she feels fine!  I am sure Taylor will get it on tomorrow or Saturday.  Booo!  And today has just been one of those days, everything that could go wrong has gone wrong and there isn't a whole lot I can do from home to fix the problems.

Anyway last night I decided to make some more 4th of July decor.
Cute fabric pennant garland, love it!

And then I decided to make another flag.  I started with some fabric strips and ironed them onto fusible interfacing (or at least that's what I think it's called).  I had found a frame at a garage sale and wrapped it in muslin.  Here is the finished product, I just don't love it.

Maybe it's the frame?  I might like it better if it was painted black instead of wrapped in fabric.  Back to the drawing board on this one.

Monday, June 28, 2010

4th of July Decor....Finally

I finally found the time quit being so lazy to make 4th of July signs for my front step post things, click here and here to see them in the making!


I used a 1x4 for the following project.  I cut a piece 11" long, another piece 4" long and the last piece 7" long.  I set the 4" piece aside and cut the other 2 pieces into thirds.


I didn't really have to cut the boards into thirds, but it made it so much easier to paint the stripes, I didn't have to tape anything off!


After I gave my paint approximately 3 minutes and 48 seconds to dry, I glued it back together using wood glue.  After letting the wood glue sit for approximately 4 minutes, I took it out to the garage and sanded and glazed it.  I kind of wanted it to look dirty and old.


Dirty and old?  Check!  Next I cut a few stars out of vinyl to finish my flag!  The little wood block is supposed to be a firework, I was running out of time before the girls woke up from their nap, but at least it passes the red, white and blue test!


At least my front step is ready for the 4th of July!


Saturday, June 26, 2010

Personalized Gifts

I had the honor of attending a great friends baby shower today!  And of course I waited until the last minute to make a gift....I started it last night!  I love to receive personalized hand made gifts, it always makes me feel special, so I try to always make something for special occasions.  I decided to make a monogrammed frame, a name block, and I attempted a pillow that turned out ok.

K is for Khloe, isn't that the sweetest name!  I started with a red frame from the dollar store and spray painted it Heirloom White.
I almost remembered to take a picture before I started glazing it with my Ralph Lauren "Smoke" glaze.
Here it is finished  I used my Cricut to cut the K out of pink vinyl and applied it directly to the glass.  I used a staple gun to attach ribbon to the back of the frame to hang it with.
I love name blocks, I think they are adorable.  I used 2x2's and cut them down to the size I wanted.  I painted them with craft paint (I literally finished this 5 minutes before I left) and glazed them.  I applied the paper with spray adhesive and sanded the edges.  I cut her name out of pink vinyl and applied it directly to the wood.
 Here is my pillow attempt.  I used muslin and some cute white eyelet trim.  I used heat and bond to "sew" my pillow, I think it would have been so much faster to use a sewing machine but didn't want to drag myself over to my Gramma's to borrow hers....lesson learned.  I cut the crown out with my Cricut and the Home Decor cart and used craft paint and a dauber thing to paint it.  Not bad for 30 minutes!

I hope everyone had a wonderful weekend! 

Featured at bobbypins boardwalk
Tatertots and Jello

Saturday, May 22, 2010

A Friend for my Welcome Post

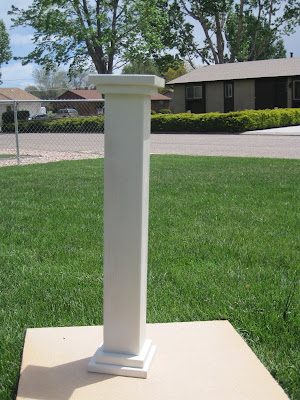
#2 completes my front step.....for now at least!  I love the Welcome Post that I made last week, but I thought my front step didn't look complete.  So I decided to make her a friend!

Introducing the skinny!  I ♥ her!

For this project I cut a 2x2 24" long, I cut down a 1x6 into 2 3.5"x3.5" squares and 2 2.5"x2.5" squares.  I centered the squares and screwed through the middle into the 2x2.  


Did I mention I started this project at 10:30 after the girls went to bed and needed to spray paint?  No problem I made my own indoor spray booth!  My husband would probably kill me if he knew I spray painted in the garage, but what he doesn't know won't hurt anyone :) 


After I sprayed it black I am addicted to black and distressed it.  I used a cheap mug hook I bought at WalMart and screwed it in near the top.


To make my sign I cut a 1x4 down to make a 3.5"x4.25" rectangle and sprayed it heirloom white.  I gave it 5 minutes to dry and used my ink pad on the edges.  I used my Cricut and vinyl to cut the fleur de lis.  I drilled a hole near the top and used ribbon for the hanger.  I added some cheap upholstery tacks to the corners for a little extra.


And now I believe that my step is complete!


And remember the pot casualty from last week?  Nothing that a little gorilla glue couldn't fix, it's as good as new!  We are heading to the bridal shower tonight so I will post pics of everything we made tomorrow!  Can't wait!

Linking to
Visit thecsiproject.com

Saturday, May 15, 2010

While Daddy's Away, Mommy Will Play

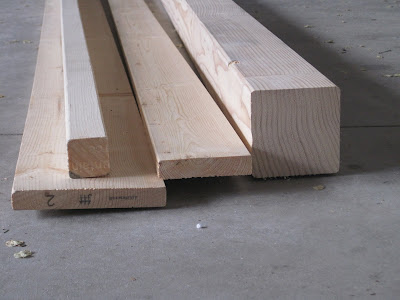
So my husband is gone for the next two weeks, which means two weeks of crafting and projects without feeling guilty!  It was finally a nice warm day today, so the girls and I headed to Ace for materials for today's project.  We made it through the store quickly and with no drama!  And we came home with this.
 2x2, 1x6, 1x4, 4x4

I had seen a really neat tutorial here to make your own candle sticks and I had seen a tutorial here to make candle stick hangers at Drab to Fab.  I loved the candle sticks but didn't trust my kiddos not to touch in the house (4x4's are heavy) so I decided to combine the 2 and make something for my front step.


I cut my 4x4 24" long.  I cut my 1x6 down to make 2 5 1/2"x5 1/2" squares and 2 4 1/2"x 4 1/2" square.


I stacked the 4 1/2" square on top of the 5 1/2 square and screwed the 2 together from the bottom.  I then attached it to the 4x4, flipped it over and repeated.  After this step you want to make sure everything is square.  The girls helped to make sure it was nice and sturdy.


I gave it a quick coat of spray primer and then a light coat of heirloom white along the edges.  When it was dry 2 minutes later (ha ha, I 'm surprised anything I do turns out because I don't have the patience to wait the recommended time) I gave it multiple coats of flat black spray paint.


Once the black was dry 15 minutes later I used my sanding sponge to distress the edges.


I bought the cheapest hook I could find and sprayed it ORB.  While I waited for this to dry, yes I actually gave it 15 minutes I went in the house to make my sign.  I used the 1x4 I bought and cut it to 11", sprayed it heirloom white, sanded the edges and then inked it with an ink pad.


I used my cricut to cut the vinyl, slapped it on, drilled 2 holes at the top and used beading wire for the hanger.


I have already decided to make some different signs to hang for the different seasons, but for now Welcome will do.


Here is another picture of the front step.  Wondering what all the dirt is doing laying there?  Did I mention I had 2 helpers today and we had a casualty?


Sunday, April 25, 2010

Plates & Platters

I am currently addicted to using plates and platters in my decor.  I think the biggest reason that I love them is that you can pick them up at the Dollar Store or the thrift store for about $0.50 each!  There are so many ways that you can decorate them, I thought I would share my ideas!
I really, really, really like the way this turned out.  All I used was jute, my glue gun, scrapbook paper and stamps.  I picked faith, love and hope because I like to have little reminders around the house about what is truly important.
This is displayed in my entertainment center.  I got the cute little potted plant at Alco on clearance for $1.50 (I actually bought them out, 9 clearance plants!?!?) and the picture is from my senior year in High School, it's me, my sister and my cousin during volleyball season!
I used jute, ribbon and paper again.  Love is Patient!  So true, especially when it comes to the little ones!
Displayed in another shelf in the entertainment center.  That is a pic of me and my hubby in Las Vegas when we were still dating!
I am also obsessed with monograms!  Please excuse the tags on the plate stands, I couldn't find the scissors when I put them up and they sit up high where no one can see them  I splurged on the white platter, I bought it at WalMart for $4 i think and the black plate was a quarter at the thrift store.  I simply glued some scrapbook paper onto the center of the platter and used my Cricut to cut out the H.  The polka dot plate was inspired by Jen at Tatertots and Jello, click here to see hers!

Saturday, April 17, 2010

Update - Picnic, Picnic, Who Loves a Picnic?

Update on the picnic table project!  I finally got the picnic table stained and added some vinyl lettering to the seats!
The girls picked out their vinyl color (it's pink kind of hard to tell, extremely overcast and gloomy today).  Kielyn requested the hearts!
I love it and the girls love it!  I included the original post below if you would like to see my Uncle's amazing shop or see the action photos of the build!

Original Post.....
My girls love picnics!  Tuesday night the weather was perfect and by perfect I mean 70 degrees perfect.  The girls were out playing in the back yard and I was grilling steaks.  Kielyn asked me if we could eat outside and I told her that we could.  So I hauled the booster chairs out of the dining room (kind of a pain because they are strapped down and mostly because I am lazy) and set them up at the table.  They still had a hard time eating because the patio chairs are so deep and they can't quite reach the table.  So I decided that they needed their own table.  So I went out in search for plans for a picnic table online.  And that's when I met Ana, my new bff!  Have you been to Knock Off Wood?  Her site is amazing!  She has plans for everything that you have ever drooled over in the expensive catalogs and can't afford (and the reason I don't mention store names is because recently she received a letter from the lawyers of the big store for infringement reasons).   Anyway go check her out, her site is amazing!

So Furlough Friday Craft Day went off without a hitch!  I was complaining last because the weather was supposed to be bad today and I called my uncle this morning to borrow a couple of tools and he offered to let me use his shop.  So this is what I worked in today!

Can you say love?  Everything you could ever want or need is in his shop.  Table saw, Miter saw, Jointer, Router Table, sanders, drills, bits and so much more.  I ♥ his shop!  So bright and early I headed to Ace to pick up my wood.  I decided to use redwood, it's a little more expensive but less splintery and with my amazing instructions I got started.  First I cut my wood according to Ana, did I mention how much I love her?!?!
Following the instructions I carefully put it together, here are the action shots(kind of, I was by myself and someone had to take the pictures)...insert Tim the Tool Man grunt here!
Table top assembled.
Table top supports.
Leg assembly, I now love clamps!
Look, they stayed on!
4 legs!  After this step I did set the table on the ground to check for wobble and levelness and my table didn't wobble.  Yay for me!!
Bench supports going in, the men in my family would be so proud of me, not only did I make sure the board was level on the side I was working on but I also checked to make sure that it was level to the other support, don't want the kiddos sliding off.
Good to go!
Checking for wobble again.


I am linking up with Fireflies and Jellybeans Show Off Your Stuff party here.  And Just A Girl for Show and Share day here!
And Fingerprints on the Fridge for Feature Yourself Friday here!
And Finding Fabulous for Frugaliscious Friday here!
Related Posts with Thumbnails